Integration with Cisco ASA manual
Table of contents
- Test environment description.
- Gateway configuration.
- Defining RADIUS-servers for AUTH.AS.
- Configuring parameters of cryptography.
- Uploading AnyConnect-package to the device.
- Configuring group policy.
- Configuring tunnel-group and tying to group policy.
- Client configuration - Anyconnect.
- Client configuration - IPSec/L2TP.
- Client configuration - Shrew.
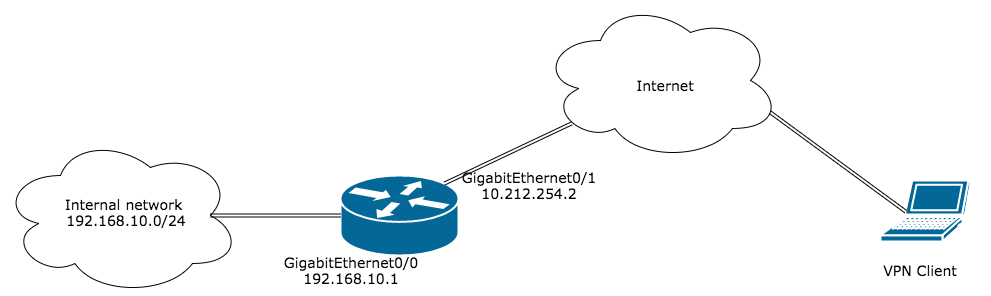
Test environment description
This manual contains information which will help you to configure Cisco ASA for using remote access tools together with AUTH.AS two-factor authentication service.
Cisco AnyConnect, IPSec VPN with third-party clients (Shrew) and IPSec over L2TP are considered as the remote access tools in this case.
Depending on ASA version the settings may vary. This manual is good for Cisco ASA version 9.6.
The diagram below represents the test setup:
back to the table of contents.
Gateway configuration
1. Basic ASA configuration
In this step it is necessary to perform basic configuration of devices which will be utilized as VPN-servers. Basic configuration of devices remains the same for all types of remote access regardless of which one of them you select.
Basic configuration includes:
- Configuration and activation of device interfaces. Example:
- Defining the pool of IP addresses for remote hosts. Example:
- Defining the objects corresponding to utilised network segments. Example:
- NAT configuration.
!Internal network interface:
interface GigabitEthernet0/0
nameif inside
security-level 100
ip address 192.168.10.1 255.255.255.0
!External network interface:
interface GigabitEthernet0/1
nameif outside
security-level 0
ip address 10.212.254.2 255.255.255.248
ip local pool REMOTE 192.168.20.1-192.168.20.20 mask 255.255.255.0
!Object for internal network:
object network INSIDE-HOSTS
subnet 192.168.10.0 255.255.255.0
!Object for remote network:
object network VPN-HOSTS
subnet 192.168.20.0 255.255.255.0
It is necessary to configure translation of local IP addresses towards Internet as well as turning off NAT between pools of local network and remote clients network.
Example:
object network NAT
subnet 192.168.10.0 255.255.255.0
nat (inside,outside) dynamic interface
nat (inside,outside) source static INSIDE-HOSTS INSIDE-HOSTS destination static VPN-HOSTS VPN-HOSTS
2. Configuring ACL:
In this step it is necessary to clearly describe network interactions by which remote clients will gain access when connecting via AnyConnect or other client applications.
For configurations assuming usage of IPSec it is necessary to allow using the corresponding ports.
ACL configurations for ASA with different types of remote access are listed below:
| AnyConnect | L2TP/IPSec | Shrew and other IPSec-clients |
|---|---|---|
| !Access for remote users to the internal network: access-list split_vpn extended permit ip object INSIDE-HOSTS object VPN-HOSTS access-group outside in interface outside | !Opening access for IPSec protocols on external interface: access-list outside extended permit udp any host 10.212.254.2 eq isakmp access-list outside extended permit udp any host 10.212.254.2 eq 4500 access-list outside extended permit esp any host 10.212.254.2 access-group outside in interface outside | !Opening access for IPSec protocols on external interface: access-list outside extended permit udp any host 10.212.254.2 eq isakmp access-list outside extended permit udp any host 10.212.254.2 eq 4500 access-list outside extended permit esp any host 10.212.254.2 access-group outside in interface outside |
| !Access for remote users to the internal network: access-list RVPN-ALLOWED extended permit ip object VPN-HOSTS object INSIDE-HOSTS | !Access for remote users to the internal network: access-list RVPN-ALLOWED extended permit ip object VPN-HOSTS object INSIDE-HOSTS | |
| !Defining which traffic to put through the tunnel: access-list RVPN-SPLITT standard permit 192.168.10.0 255.255.255.0 | !Defining which traffic to put through the tunnel: access-list RVPN-SPLITT standard permit 192.168.10.0 255.255.255.0 |
back to the table of contents.
Defining RADIUS-servers for AUTH.AS
In this step it is necessary to define RADIUS-servers to be used for authentication by AUTH.AS service.
AUTH.AS service use port UDP/1812 to authorise users via RADIUS which is required to be specified on the device when configuring “AAA-server”. It is also necessary to specify PSK key which will be used for queries to RADIUS servers. You can see the current key or set a new one in AUTH.AS system.
If necessary to specify a group of servers, you must detect them one-by-one using the command aaa-server AUTHAS (interface) host "ip"
Example:
aaa-server AUTHAS protocol radius
aaa-server AUTHAS (outside) host 10.213.56.3
key 6N4q93to
authentication-port 1812
accounting-port 1813
back to the table of contents.
Configuring parameters of cryptography
Configuration of ASA device at this step significantly differs depending on selected type of remote access.
In particular, in order to provide a user with possibility to authenticate a VPN-server based on AnyConnect and at the same time ensure secure connection between VPN-client and gateway, it is necessary to configure RSA.
Otherwise, it is necessary to configure IPSec at ASA. Configuration of cryptography for different types of remote access are listed below:
| AnyConnect | L2TP/IPSec | Shrew and other IPSec-clients |
|---|---|---|
| !Generating RSA keys: crypto key generate rsa label AnyConnect-KeyPair | !Choosing encryption policy (parameters of protected data transferred via tunnel phase 2): crypto ipsec ikev1 transform-set 3DES_SHA esp-3des esp-sha-hmac | !Choosing encryption policy (parameters of protected data transferred via tunnel phase 2): crypto ipsec ikev1 transform-set 3DES_md5 esp-3des esp-md5-hmac |
| !Configuring self-issued certificate: crypto ca trustpoint AnyConnect_Trustpoint enrollment self subject-name CN=ASA-AnyConnect keypair AnyConnect-KeyPair proxy-ldc-issuer crl configure crypto ca enroll localtrust noconfirm crypto ca certificate chain AnyConnect_Trustpoint certificate ef9a8059 .... quit | !Tunnel mode is used by default, Windows L2TP clients use transport mode of IPSec: crypto ipsec ikev1 transform-set 3DES_SHA mode transport | !Applying transform-set to dynamic crypto map: crypto dynamic-map RVPN 10 set ikev1 transform-set 3DES_md5 |
| !Tie trust-point for ssl connections to external interface: ssl trust-point AnyConnect_Trustpoint outside | !Applying transform-set to dynamic crypto map: crypto dynamic-map L2TP 10 set ikev1 transform-set 3DES_SHA | !Configuring insertion of recursive static route to the address given to the client (RRI): crypto dynamic-map RVPN 10 set reverse-route |
| !Applying the dynamic crypto map to a static (dynamic map cannot be tied to interface directly): crypto map L2TP 10 ipsec-isakmp dynamic L2TP | !Applying the dynamic crypto map to a static (dynamic map cannot be tied to interface directly): crypto map vpn 20 ipsec-isakmp dynamic RVPN | |
| !Applying crypto map to the interface: crypto map L2TP interface outside | !Applying crypto map to the interface: crypto map vpn interface outside | |
| !Creating encryption policy for phase 1: crypto isakmp identity address crypto ikev1 enable outside crypto ikev1 policy 20 authentication pre-share encryption 3des hash sha group 2 lifetime 86400 | !Creating encryption policy for phase 1: crypto isakmp identity address crypto ikev1 enable outside crypto ikev1 policy 10 authentication pre-share encryption 3des hash md5 group 2 lifetime 86400 |
back to the table of contents.
Uploading AnyConnect-package to the device
This step only required when configuring remote access via AnyConnect.
Before configuring remote access on ASA it is necessary to upload AnyConnect package to the device. This package is available from official Cisco website. Use embedded TFTP or HTTP(s) clients to upload AnyConnect to ASA.
During configuration of access to AnyConnect on the device, you must specify the location of uploaded AnyConnect package as well as set permission for the user to select required “tunnel-group” using tunnel-group-list enable command.
Example:
!Enabling access to Anyconnect:
webvpn
enable outside
anyconnect image disk0:/anyconnect.pkg 1
anyconnect enable
tunnel-group-list enable
back to the table of contents.
Configuring group policy
In this step it is necessary to define group policy for remote users. Pay special attention to “vpn-tunnel-protocol” command specifying what encryption type will be used for clients and also to “split-tunnel-network-list” command specifying that only traffic with parameters listed in acl “split_vpn” will be encrypted.
In “group-policy” settings it is also possible to configure provisioning of additional parameters like DNS, WINS etc. for clients.
Parameters of group policies for different types of remote access are listed below:
| AnyConnect | L2TP/IPSec | Shrew and other IPSec-clients |
|---|---|---|
| !Configuring group policy: group-policy Default internal group-policy Default attributes vpn-tunnel-protocol ssl-client ssl-clientless split-tunnel-policy tunnelspecified | !Configuring group policy: group-policy HOSTS_L2TP internal group-policy HOSTS_L2TP attributes vpn-tunnel-protocol l2tp-ipsec | !Configuring group policy: group-policy RVPN internal group-policy RVPN attributes |
| !Specifying which traffic routed via the tunnel: split-tunnel-network-list value split_vpn address-pools value REMOTE | !Access only to internal network: vpn-filter value RVPN-ALLOWED | !Access only to internal network: vpn-filter value RVPN-ALLOWED vpn-tunnel-protocol ikev1 |
| !Tunnel only the traffic defined in ACL: split-tunnel-policy tunnelspecified | !Tunnel only the traffic defined in ACL: split-tunnel-policy tunnelspecified | |
| !Specifying which traffic routed via the tunnel: split-tunnel-network-list value RVPN-SPLITT address-pools value REMOTE | !Specifying which traffic routed via the tunnel: split-tunnel-network-list value RVPN-SPLITT address-pools value REMOTE |
back to the table of contents.
Configuring tunnel-group and tying to group policy
During the final step you must define “tunnel-group” and tie it to group policy.
Parameters of “tunnel-groups” for different types of remote access are listed below:
| AnyConnect | L2TP/IPSec | Shrew and other IPSec-clients |
|---|---|---|
| !Configuring tunnel-group and tying it to group policy: tunnel-group ANYCONNECT type remote-access tunnel-group ANYCONNECT general-attributes address-pool REMOTE authentication-server-group AUTHAS authentication-server-group (outside) AUTHAS default-group-policy Default tunnel-group ANYCONNECT webvpn-attributes | !Windows L2TP client does not have the option of configuring the tunnel group, therefore we use default tunnel group DefaultRAGroup: tunnel-group DefaultRAGroup general-attributes address-pool REMOTE authentication-server-group (outside) AUTHAS default-group-policy HOSTS_L2TP tunnel-group DefaultRAGroup ipsec-attributes ikev1 pre-shared-key cisco tunnel-group DefaultRAGroup ppp-attributes authentication pap | !Configuring tunnel-group and tying it to group policy: tunnel-group RVPN type remote-access tunnel-group RVPN general-attributes authentication-server-group AUTHAS authentication-server-group (outside) AUTHAS default-group-policy RVPN tunnel-group RVPN ipsec-attributes ikev1 pre-shared-key 0987654321 |
| !Name of the group at user screen: group-alias ANYCONNECT enable |
Client configuration - Anyconnect
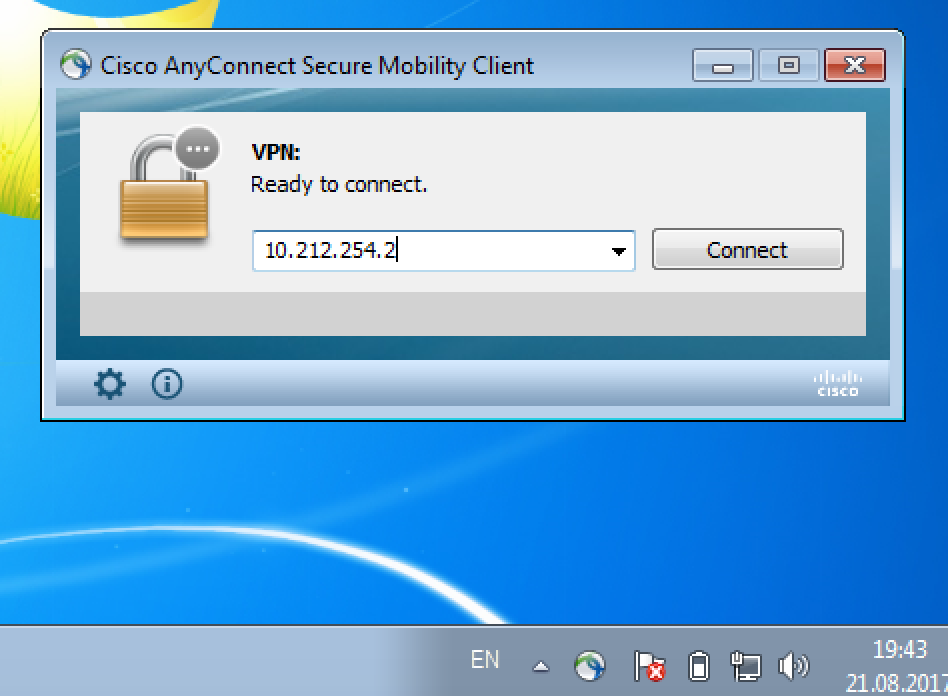
1. Install and run Cisco AnyConnect Secure Mobility Client. Enter IP-address or name of your VPN-gateway in the field below and click “Connect”:
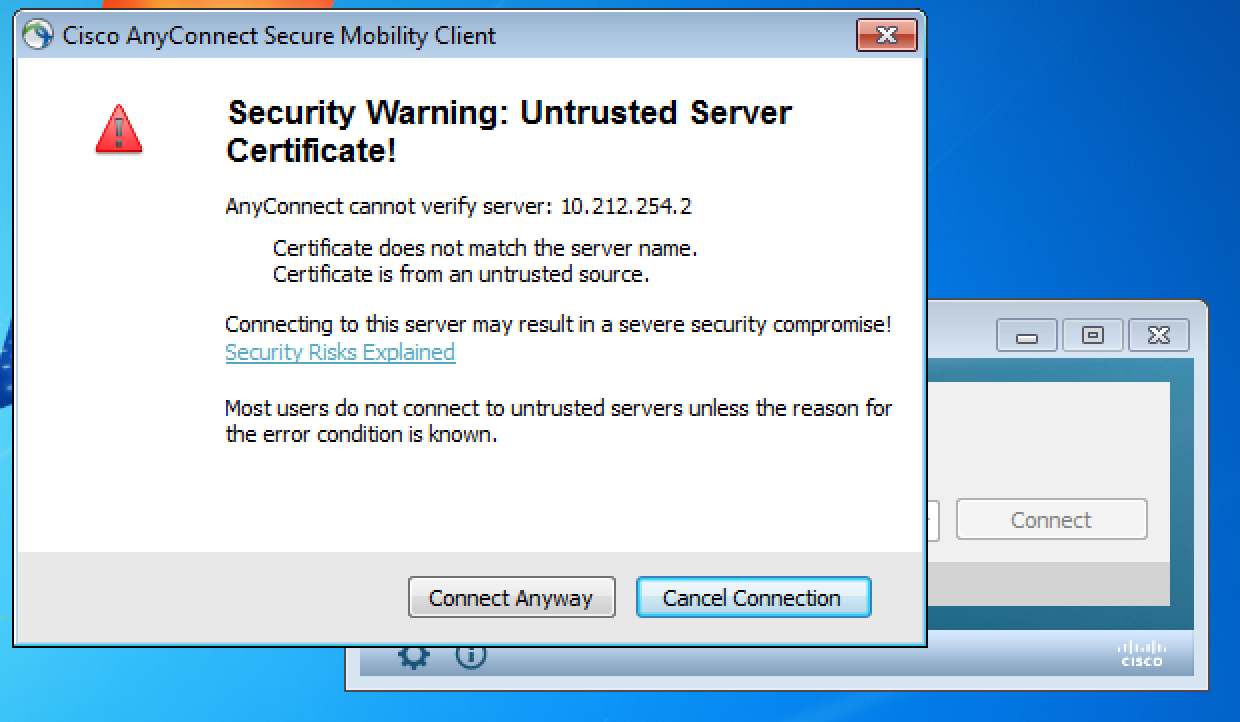
2. In case that you use self-signed certificate for authentication you will see this message:
3. After establishing the connection with the gateway, you will be prompted to select “tunnel-group” and to enter login and password:
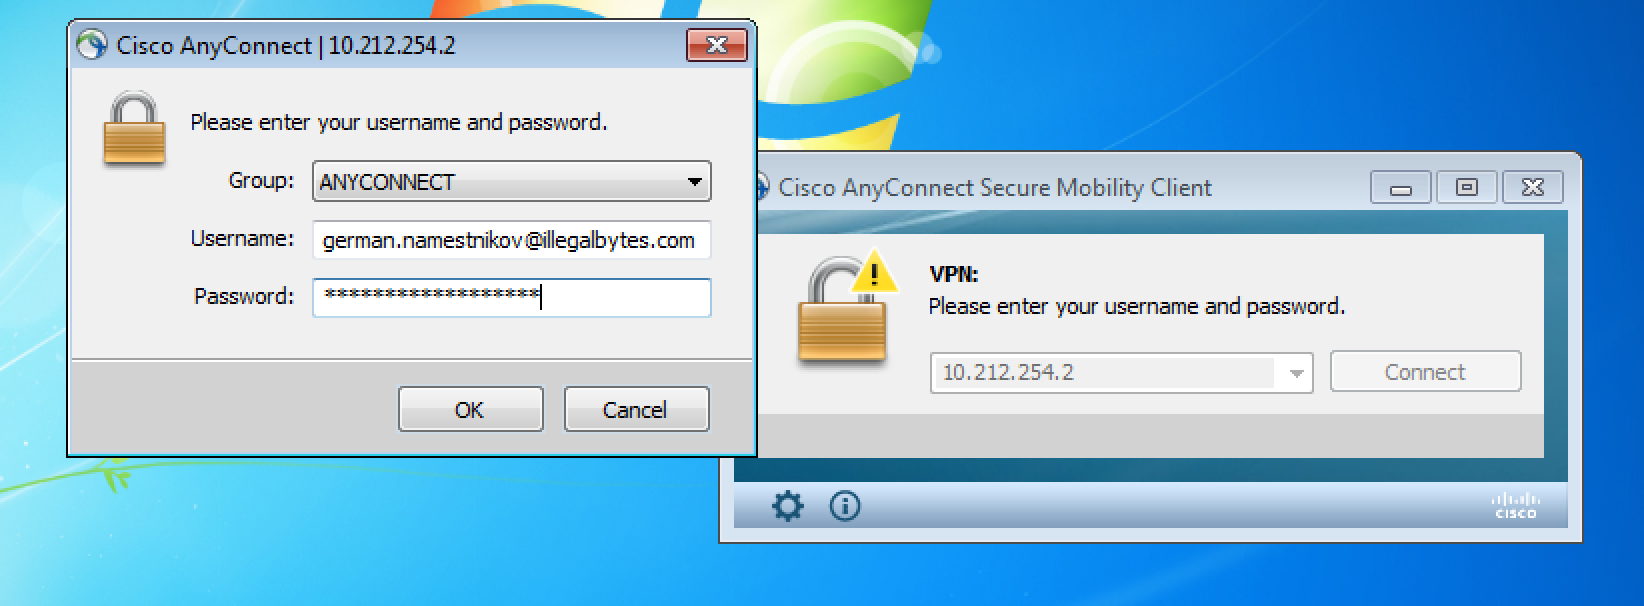
To connect, enter your login and password. Note, that password is entered as a string: first part of which is your passphrase and the rest are six digits generated by your AUTH.AS: token mobile app. After registering in AUTH.AS system, user will receive detailed instructions via email describing installation and configuration of mobile app which will generate second-factor passwords. Enter both passwords in a row without any spaces and hit OK.
Client configuration - IPSec/L2TP
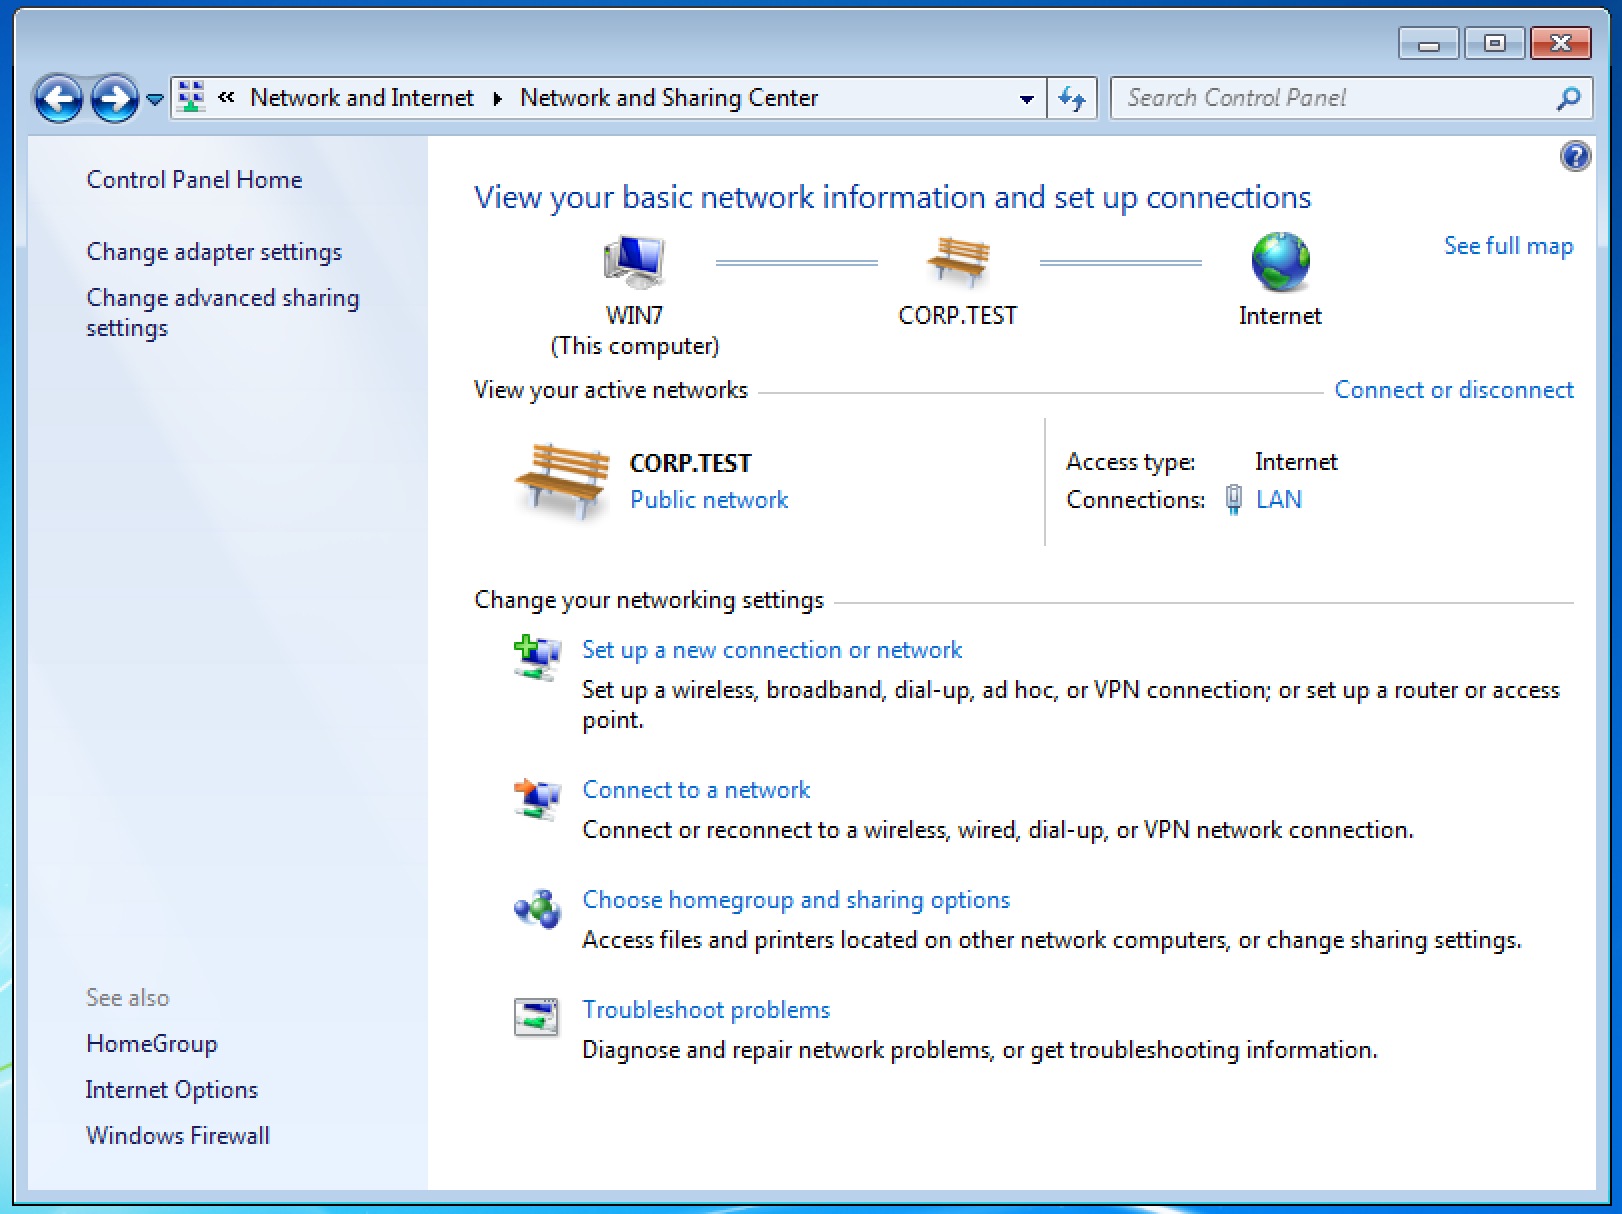
1. Open Network and Sharing Center.
2. Click “Setup a new connection or network”:
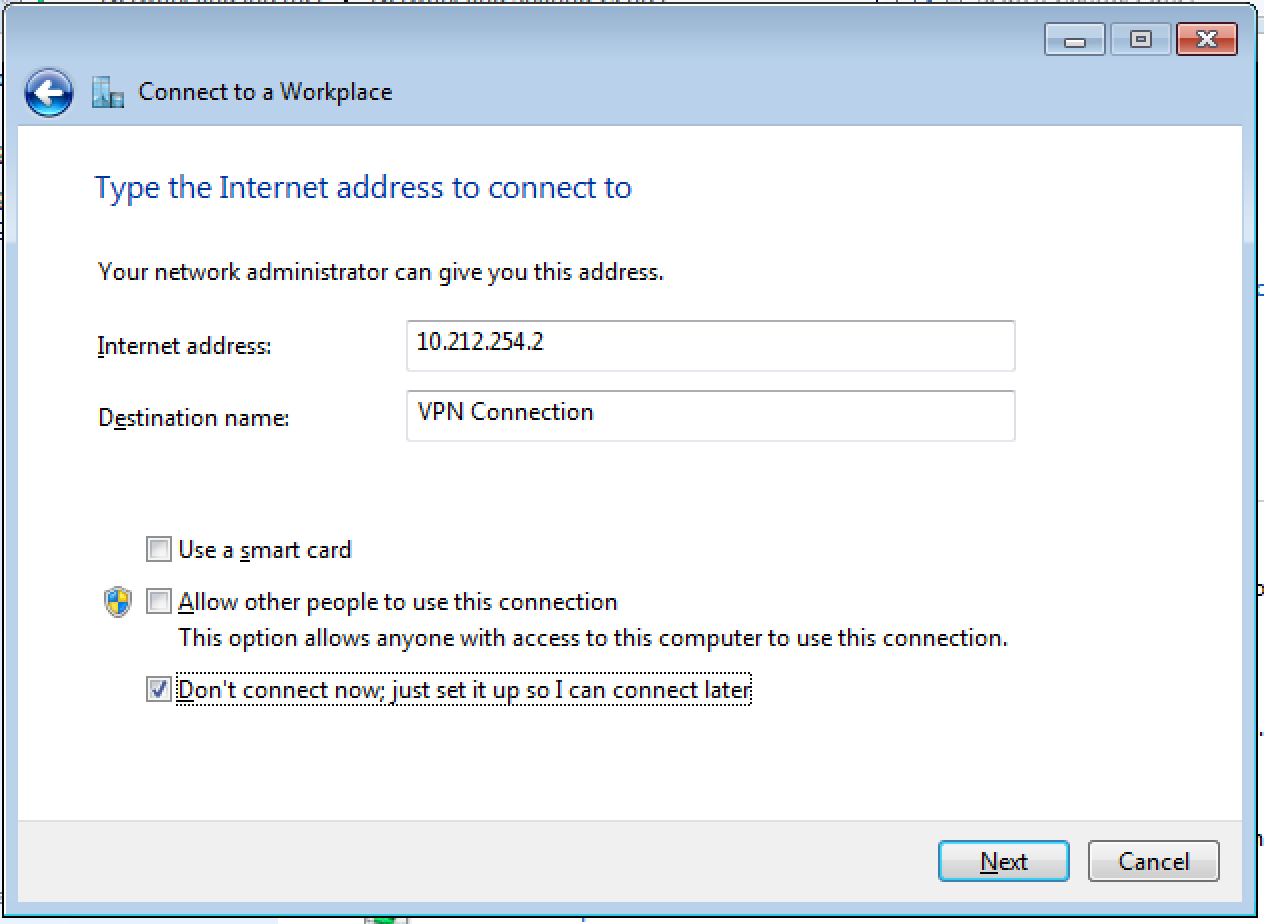
3. In opened window select “Connect to a workplace” -> “Use my Internet connection (VPN)”.
4. Enter connection parameters. Note, that you shouldn't connect right after completing configuration, because you must first specify the PSK used for establishing IPSec connection.
5. Open your saved connections and go to Properties of your newly created connection:
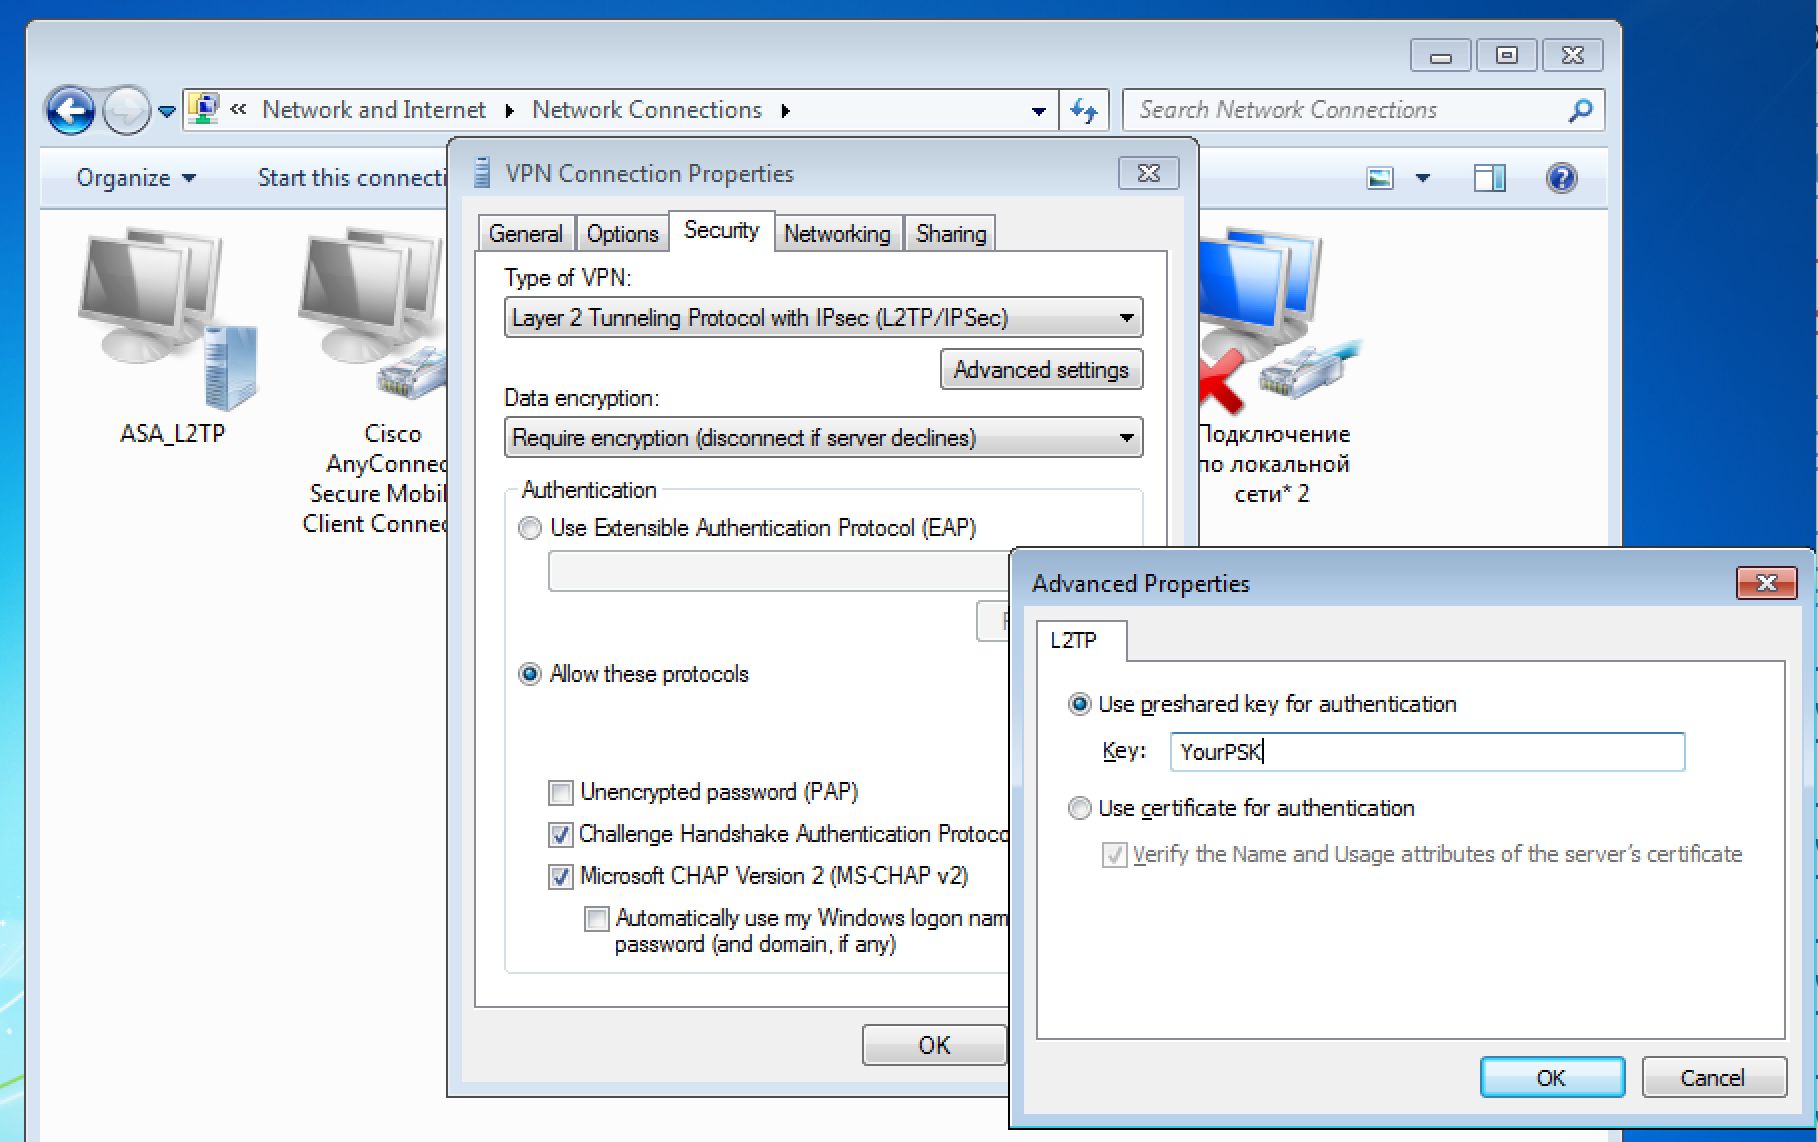
At the Security tab set VPN type as shown in the picture and specify key used for connection in a window called by clicking on Additional Parameters button.
Since user authentication requires sending user password to the RADIUS server, you must specify PAP as the authentication protocol and uncheck all other options:

6. After completing all above steps, start the connection and enter your login, password with token and hit "Connect":

Client configuration - Shrew
In this example the open-sourced IPSec client Shrew is used for remote access. Download it here: https://www.shrew.net/download/vpn
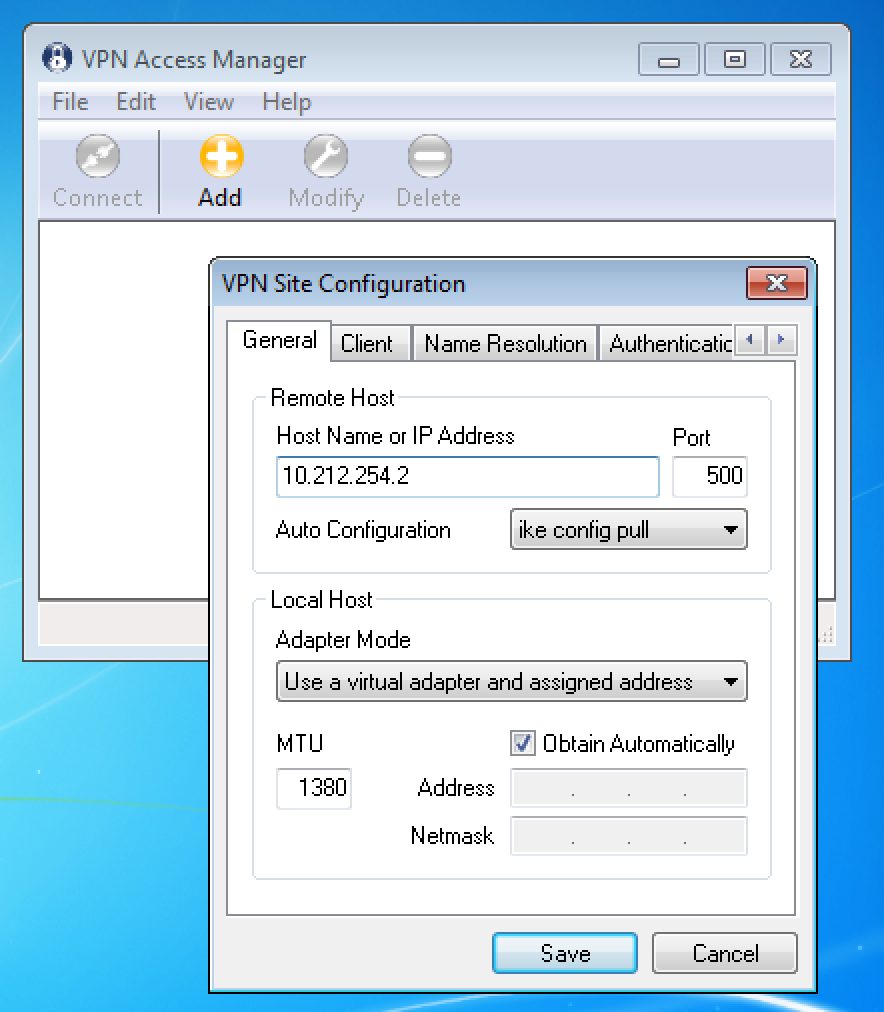
1. ПAfter installing and running Shrew, you must add new connection by clicking “Add” button. In new window you must enter address or name of the gateway to which connections will be made:
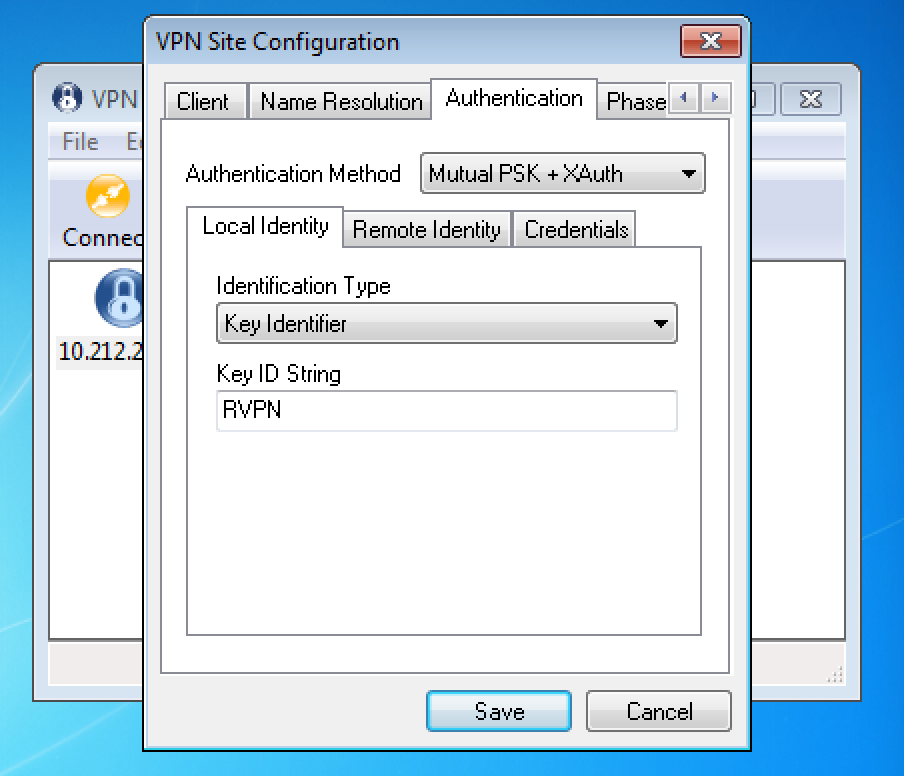
2. At Authentication tab you must change value of the "Authentication Method" field to “MutualPSK+XAuth”, for “Local Identity” set “Identification Type” value “Key Identifier”, and for “Key ID String” set value which you used during configuration of crypto dynamic-map (in given example - “RVPN”):
3. At “Remote Identity” tab select “IP Address”.
4. At “Credentials” tab you must specify value of “Pre Shared Key” same as PSK you used for configuring ASA.
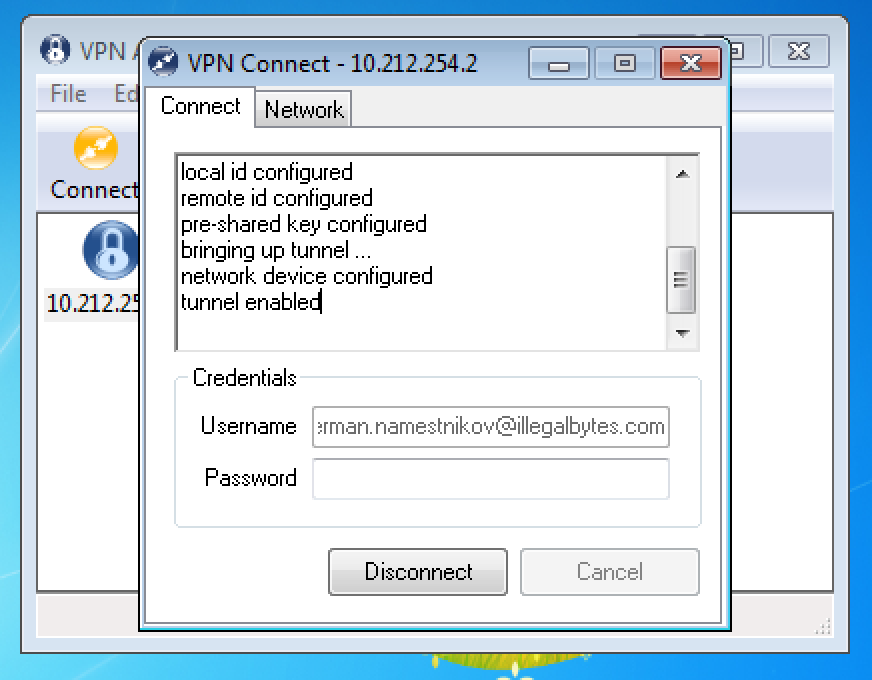
5. After this, select newly created connection and hit “Connect”. You will see a window prompting for you login and password. For password, enter your passphrase and complete it with six digits generated by AUTH.AS: token mobile app.
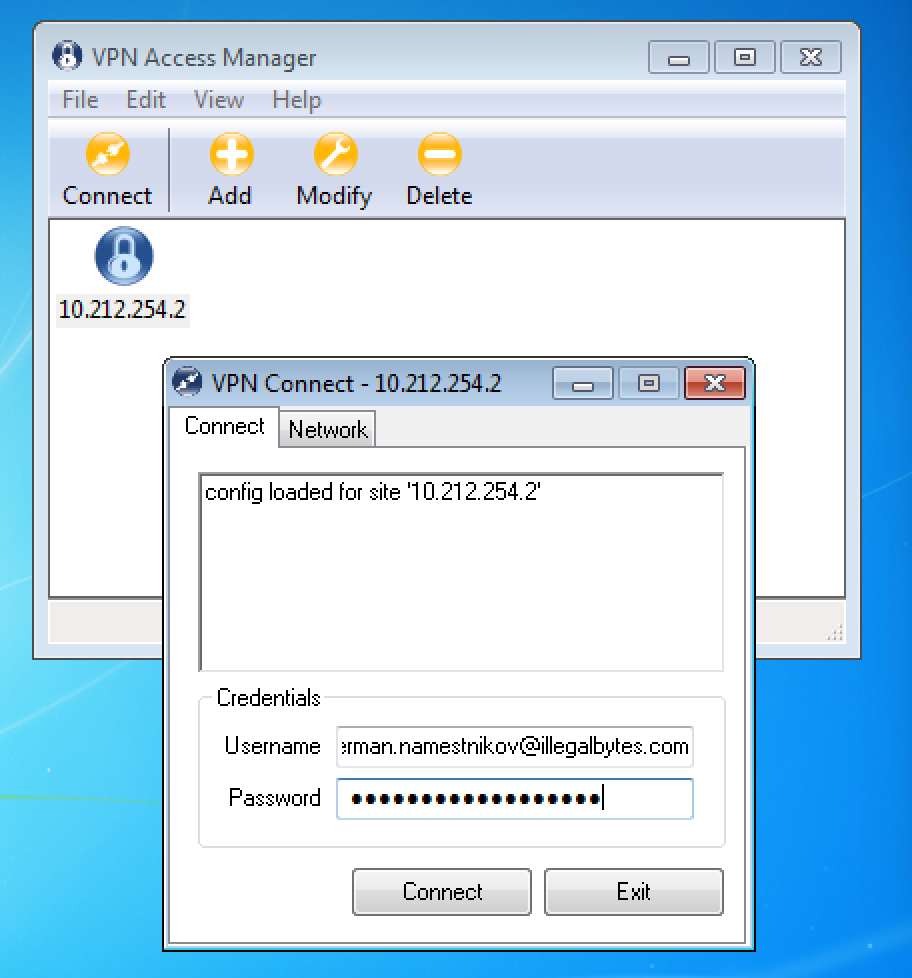
6. After entering login and password, hit “Connect”. If all settings are correct the connection will be successful.